Login

Register

Login

Register

Voice Over

Voice Over Solutions for Schools Video and audio class

In Atlanta Georgia we were invited to a local High School to help find a solution for doing Voice over for their Video/Audio class. Currently they were trying to refurbish a janitor;s closet into a vocal booth by sticking some foam to the walls.  It did not work too well.

We presented the AVB33 – Acoustic Vocal Booth 3 x 3, that delivered great sound right there in the Video room. In this video we also quickly touch on WHY do you need to have your room acoustically treated.

Portable Vocal booth delivers consistent sound anywhere I go. – Testimonial.

in this Testimonial Dean Wendt – professional Voice actor for over 25 years, picks up on often overlooked advantage of VOMO – Voice Over MObile recording studio – it its consistency of the sound. He said that, he travels a lot and anywhere he takes VOMO with him. (I saw how he packed it, with all extension cords and gear in it! )

He said that hi main concern was revisions and making then sound consistent with the rest of the take. With VOMO – there was never a problem!

Testimonial from the Experts

Before the actual product was available we sent a prototype sample to industry experts.

See what they have to say:


Tara Strong

We hope you enjoyed our last voice actor blog about Frank Oz. Our next voice actor star is a known for her many cartoon characters, and boy does she have a list! From, Hello Kitty to Timmy Turner, Raven to Twilight Sparkle, Dil Pickles to Bubbles and so many more, this American-Canadian actress has captured the hearts of many with her chameleon-like vocal prowess. Second on VocalBoothToGo.com’s list of Top Voice Actors is none other than Tara Strong.

Tara Strong was born on February 12, 1973 in Toronto, Ontario. Tara showed a strong interest in acting at an early age. When she was 4, she played a solo role for a school production. She even worked at the Yiddish Theater, learning her lines phonetically since she could not speak the Yiddish language. (1) This showed her talent for vocal ability and adaptivity at a young age. Tara got her first professional role in Limelight Theater’s production of The Music Man as Gracie. (1) After receiving a few other smaller roles on television, she moved to Los Angeles in January 1994.

Tara Strong’s first major cartoon voice over role was for Hello Kitty’s Furry Tale Theater as none other than the famous Hello Kitty.  She also played main characters for Nickelodeon and Cartoon Network shows.  She played Dil Pickles from Rugrats, Batgirl from The New Batman Adventures, Bubbles from The Powerpuff Girls, Timmy Turner from The Fairly OddParents, Bebe and Cece from The Proud Family, Ingrid Third from Fillmore!, Raven from Teen Titans and Teen Titans Go, Omi from Xiaolin Showdown, and Twilight Sparkle from My Little Pony: Friendship is Magic: that is just a handful of roles she has played.

With the years of voice acting experience, Tara Strong has also had the opportunity to do voice overs for various video game projects. She has played Rikku in Final Fantasy X, Presea from Tales of Symphonia, and Harley Quinn from Batman: Arkham City, just to name a few.

In 2004, Tara Strong won an Interactive Achievement Award for her role as Rikku in Final Fantasy X-2. (2) In 2013, she won the Shorty Award for “Best #Actress” for her use of social media. (3) But most of all, she has given life to so many characters that we all enjoy today.

Tara Strong is still an active voice actor for both television, video games, and the movie industry. Her ability to adapt and portray a variety of characters from all ages and genders proves that she deserves to be on our Top Voice Actor list.

We will leave you with some voice acting advice from Strong herself:


1 – Mulman, Doreen. “Early Career”. TOTS – The Official Tara Strong. MKBMemorial.com. Retrieved October 10, 2014.
2 – “2004 Interactive Achievement Awards”. Interactive.org.
3 – “Shorty Award winners Cassey Ho and Tara Strong on Fox News Live”. Shorty Awards Blog. April 11, 2013.

Frank Oz

Voice acting has become a huge faction of acting nowadays. Between video games, cartoons, podcasts, movies, and more, we have relied on actors to provide no more than their vocal prowess to convey a character or role. Vocal Booth To Go wants to celebrate 20 talented voice actors from different mediums in hopes to show the importance of voice acting in today’s society. If you want to learn more about the beginnings of voice acting, please read our history of voice acting here.

Our first voice actor is someone who has done notable roles from our childhood that are still big today. From a wise teacher of a space rebel fighter to a furry blue cookie fanatic to a sassy piglet fashionista, he has forever imprinted on our hearts and memories. This wonderful voice actor is none other than Frank Oz.

Frank Oz, full name Frank Oznowicz, was born May 25, 1944 in Hereford England. He moved to Oakland California with his parents and brother when he was six. Frank was considered a shy child, and since both of parents were amateur puppeteers, Frank found puppets were an easy way to express himself. During his adolescent years, he even worked as an apprentice puppeteer at Children’s Fairyland, a storybook theme park in Oakland. While Oz was still in high school, he had a chance meeting with 23-year-old Jim Henson at a puppeteering conference. “He was this quiet, shy guy who did these absolutely amazing puppets that were totally brand new and fresh, that I had never been seen before,” Oz later recalled about Henson. At age 19, Henson asked the young puppeteer to join his Muppets team.

He first started as playing Rowlf the Dog in a variety of appearances. In fact, on one guest appearance on The Jimmy Dean Show, Jimmy Dean introduced him as “Frank Oz…,” mumbling the last part of his name. This is how Frank stuck with abbreviating his last name. When the Muppet Show started, he went on to play a variety of Muppet characters such as Miss Piggy, Sam Eagle, Animal, Fozzie Bear, and The Swedish Chef.


On Sesame Street, Frank Oz originated the characters of Bert, Grover, and Cookie Monster, and performed them exclusively for nearly 30 years.(1) He was also offered the role of Big Bird, but Oz declined due to his discomfort and hatred of playing in full body puppets.


In 1980, George Lucas contacted Henson about a puppet character he wanted for his next Star Wars film, The Empire Strikes Back, a creature known as Yoda.(1) Since Henson was pre-occupied, Oz was assigned as chief puppeteer and as creative consultant, while other Henson alumni worked on the fabrication. Oz had a great deal of creative input on the character. Oz also made the key choice himself for creating the character’s trademark style of reversed grammar. Originally, Frank Oz was only supposed to provide the puppetry, with somebody else providing the voice, but at the last minute, Lucas decided to use Oz’s voice. Oz would go on to perform Yoda in all of the sequels and prequels (the latter of which used a CGI version of Yoda), and returned as Yoda in an episode of Star Wars: Rebels.


Even though Frank Oz’s passion was puppeteering, it was his voice acting that truly brought the characters to life. In a 2000 interview, Oz said,

“I’ve made a policy over the last 15 years of not having any pictures with my characters and I, at all, in the same shot. That is because, as a director, I can walk on a film for 18 hours a day for a year — work my ass off — and people will see it and say “Ah, yeah, that’s nice. That was a good film”, Then they see one picture of me and one of my characters, and they go ape****. They’ll freak out and say, “You do that character!” The power of the Muppets, and the popularity of these characters is so iconic in people’s lives, that I’ve had to distance myself from it publicly.” (1)

Even Frank Oz knew that it was the voice of the characters that was important, and that showing his face with that character would mean losing the magic and heart of that character. I would interpret that his advice would be that recognition is only second to the enjoyment of the character you play.

This is why Frank Oz will always be one of the most iconic and talented voice actors in film, and puppeteering, history.


Here is an old interview with Frank Oz back from 1976.

(1) – “Frank Oz.” Muppet Wiki. Wikipedia, n.d. Web. 1 June 2017.
(2) – Setoodeh, Ramin. “Frank Oz on the Legacy of Jim Henson’s Muppets.” Variety. N.p., 12 Mar. 2017. Web. 26 June 2017.


The History of Voice Acting

Voice acting has become a popular alternative to being in front of the camera, and it done professionally as well as for fun by hobbyists. Can you believe it’s been almost 110 years since what is regarded as the first ever voice over was recorded? Many wrongly assume that Walt Disney was the first voice actor, voicing Mickey Mouse in Steamboat Willie in 1928, but it was actually Reginald Fessenden in 1906 who holds this achievement.

On Christmas Eve 1906, Fessenden became radio’s first ever voice, although six years earlier, he had successfully reported on the weather during a test whilst working for the United States Weather Bureau.  Fessenden reported that on the evening of December 24, 1906 (Christmas Eve), he had made the first of two radio broadcasts of music and entertainment to a general audience, using the alternator-transmitter at Brant Rock. The broadcast consisted of Christmas messages and music.

Although this may not be considered today’s definition of voice acting, we can agree that radio programs did include a lot of voice acting. Radio hosts, as well as radio narrative programs, needed talented actors to relay                                                        their stories over the air.

Today’s definition of voice acting is usually related to actors that voice animated characters. And of course, of the most recognized early voice actors was none other than Walt Disney. Walt, together with his wife Lilly, his brother Roy’s wife Edna, and Ub Iwerks, inked the first Mickey Mouse cartoons in 1928. The first two cartoons he created with Mickey didn’t sell so he added synchronized sound and provided the voices to Mickey and Minnie to the third one, Steamboat Willie. Walt Disney continued to voice Micky and Minnie Mouse until 1946.


Another key voice actor also belonged in the cartoon industry. Mel Blanc worked for Warner Bros. and Leon Schlesinger Productions and quickly became one of the most prominent voice actors of the time. A former radio personality, Mel first joined Leon Schlesinger Productions in 1936 and earned himself the title, “The Man of a Thousand Voices,” one which, to this day, he is still referred to by.  Voicing some of the history’s most famous cartoon characters, including Bugs Bunny, Tweety Bird, Porky Pig, Daffy Duck and other Warner Bros. classics, Mel is accepted by many as the first outstanding voice actor who set the bar at an incredibly high level for others to follow in his footsteps over the forthcoming years.

Prior to Mel’s involvement with Leon Schlesinger Productions, voice artists were given no on-screen credit for their work; something which changed when the company refused to award him a pay rise. As a compromise, Blanc requested that his name be added to the credits. This did wonders for his career and quickly earned him a wealth of recognition. The question we must ask is, at what stage would voice artists have been credited had Mel not asked for, and been turned down, that pay rise?

Fast forward to the present and we now find that there’s often a very fine line between a big screen actor and a voice actor and, whilst there was once a clear divide, recent years have seen some of Hollywood’s most known names voicing animated characters in both film and TV.

We will continue to explore some of today’s voice actors for movies, TV, radio, and podcasts. Stay tuned to learn more about the most influential voice actors across the nation and in the world.

How to Control Sound Reflections in a Voice Over Recording Studio

What are sound reflections and reverberations and why do you need to care?

When we talk about sound reflections think echo.

If you are in mountains, a cave, large hall or an empty room,  say something or just clap your hands – that sound gets back to you as an echo ( reflections) and repeats itself over and over ( reverberations) until it loses its energy and dies (reverberant decay).   This is because the sound reflects from one hard surface goes to the other and reflects over and over again until it loses its energy.

The same exact process happens in your studio, except that you might not hear it as loud as in a cave, but sensitive microphone will pick it up and your recording will be “inadequate”.


HOW THE SOUND BEHAVES IN A VOICE OVER STUDIO

Sound energy can be reflected by the surfaces in the room and bounce around or it can be partially absorbed, lose some of that energy and bounce around a bit less, or it can hit an odd shaped object, break apart and go in different directions with diminished energy (diffused).

These behaviors can be problematic in a recording studio – sound waves bouncing inside the room can interfere with each other, cancel or reinforce the energy at certain points,  which makes a recording in the room difficult.

How your recording affected by the way sound waves behave in a room depends on a number of factors – the frequency of the sound wave; the shape and dimensions of the room; the materials that the walls and ceiling and floor are made of and covered with; how many doors and windows are there, and where they are placed, location of the microphone and voice other actor in relation to the nearest walls , etc.,  and the contents of the room ( furniture, tapestry, equipment etc.)

One of the biggest factors that determine what happens with sound in a room is the frequency of the sound wave. As we discussed in the previous article,  lower frequencies wavelengths are long, and sound waves are more powerful.  Low-frequency sound  wave cannot be reflected by a small obstacle, so it  bends around objects in the room  and  passes through lighter materials
At mid and high frequencies, say 100Hz or so and above – sound waves are more straightforward and easier to control.

Their behavior in the room can be compared to that of a tennis ball: they bounce from hard surfaces and being slowed down (absorbed) by soft surfaces.
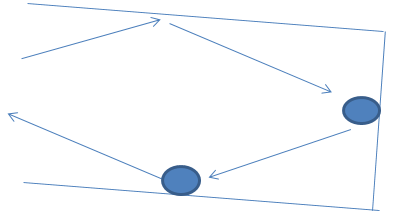
 

First reflection:


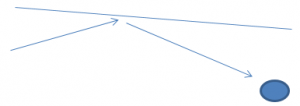
Then it will bounce from a corner:

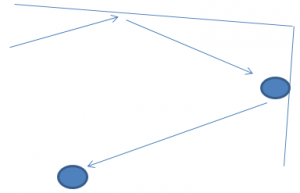
Then from the other wall:

And so on until it loses its energy. The harder and flatter the surface – the stronger the reflected sound and the longer it will be bouncing around before it dies.

(This is just a simplified example, in reality, a surface has to have a dimension equal to a wavelength to reflect sound in this manner. So our 100Hz wave will bounce off a roughly 12 ft wide wall. But will diffract (bend around) around objects that have dimensions smaller than 12 ft wide. Also, sound waves are omnidirectional, meaning that they go in all directions at once, so when they reflect they also interact and affect each other).

However, throw a ball against a pillow and it will stop because the direct energy will be absorbed by the pillow.

That’s the basic idea.


WHY REFLECTIONS ARE BAD FOR YOUR RECORDING

In reality, the voice over actor is positioned right in front of a microphone, so the microphone will pick up the sound coming directly from you, the speaker, but it will also record the sound waves reflected off by nearby walls and other surfaces.

The problem is that the microphone will record the sound from the voice over actor a very short time before the sound reflected off the walls gets to it too.  How long the delay depends on how far away the nearest reflective surface is.

This delay between the two sound waves ( direct and reflected) can result in phase differences in the waves.

As the direct sound waves of your voice and the reflected sound combine, the time/phase delay can cause cancellations and/or reinforcements in the sound waves, changing the tonality of what you are recording.

This effect is known as “comb filtering”.   And if the tonality is changed, you are not recording what you are really saying, or rather not the way you say it.


ARE THERE BAD AND GOOD REFLECTIONS?

Well, ideally you do not want any reflections in your recording. You want only direct sound to be recorded. But some reflections are indeed worse than others.

First reflections.

The worst and most powerful are the so-called first reflections.  These are the sound waves that bounced the first time, less than 20 milliseconds or so after the direct sound. Sound travels at a rate of about one foot per millisecond, so that means that any reflective surface within about 10 feet or so of the recording position will cause problems.
There are also Secondary (second bounce) and tertiary (third bounce) reflections.


Flutter echo

Flutter echo happens when the sound waves are reflected directly between two parallel surfaces – say opposing walls in a small room – back and forth.  Try it in a smallish room with hard parallel bare walls: clap your hands and you’ll  hear a rattling sound – that is flatter echo.

Most of apartment and house rooms have parallel walls, so flutter echo can be a real problem when you are recording with a microphone.


Reverberant decay

Reverberation is the sound left ringing in the room after the direct sound from the sound source stops.  It is those secondary and tertiary reflections, it is that remaining reflected sound that tends to wash together.

For most recording too much reverberation that lasts too long is a problem – recording clarity will be compromised, and there may be phase problems.

Equally important is making sure that the reverberant decay across the frequency range is even. If the reverberant decay for high frequencies is different than for low frequencies, the room will have a characteristic sound that probably won’t be desirable – a bright ring, boomy low end,  or uneven midrange. However, if the reverberant decay is too short, the room will have a dry, dead feeling and sound that will be uncomfortable.


HOW TO MANAGE REFLECTIONS AND REVERBERATIONS.

If you are thinking of setting up your voice over recording studio you might be choosing a spot in a bedroom a walk-in closet or may be in a spare room.

If you start with an empty room with hard surfaces on the walls, ceiling, and floors what do you do to manage reflections and reverberant decay?  There are two different methods:  absorption and diffusion, each of which is effective for solving certain problems. But in small rooms such as home recording studio diffusion is not as effective as absorption.  We will stop on Diffusion briefly because they are not exclusive and a combination of the two methods can be used successfully.


DIFFUSION

“Diffusion” is breaking a single sound wave into smaller reflections and dispersing them in different directions.  Because there are no big reflections going back to the microphone, first reflection problems are reduced, and because diffusive materials are irregular in shape, flatter echo is eliminated.  Although reverberation won’t be eliminated, scattering and breaking up the reflections tends to result in a smoother reverberation at a lower level.

While any irregular surface can break down reflections at some frequencies to a degree, to figure out exactly how to make a diffuser that evenly scatters a broad frequency range of sound waves requires specialized diffusion materials. Such specialized diffusers are hard to build and they can be expensive.


ABSORPTION

Remember the example of echo in the mountains?  Now, why is it so quiet when the snow is falling?  That is because the snowflakes absorb the sound and speed up the reverberant decay.

For voice over recording studios, absorption is the main method for managing first reflections in mid- and high-frequency range,  flutter echo and reverberant decay.

The idea is to use sound absorption materials placed at the main reflection points to reduce – absorb – sound energy so that the level of the reflected sound waves is significantly quieter than the direct sound.

Absorption works best with high- and midrange frequencies. Lower frequencies require large quantities of absorptive material for effective energy reduction.

Very high frequencies have a very little energy compared to low frequencies, so thin, soft materials can be used to absorb them.  As the frequency gets lower, thicker and heavier absorptive materials are required.   Those thicker sound absorption materials are even more effective at controlling high frequencies.

There is an array or sound absorption materials that can be used and we will talk in details about it later. Most fall into the category of porous absorbers. These materials consist mineral wool, acoustic blankets,  clothing, curtains, carpets and acoustic foam

The sound-absorbing effect comes from the fact that the sound energy can penetrate the material on hitting the surface. Here, the sound energy is converted into heat energy, so that only a small part is reflected in the form of sound energy. In other words, the material has absorbed some of the sounds.

The sound absorption in acoustic foam and acoustic sound absorption blankets works differently. 


Acoustic foam is a popular material for lining up the recording studios.  They are often shaped in a conical or egg crate shape.  The make of acoustic foam is different from the make of the packing foam even though they might look the same and even YouTubers may claim they can stuff the packing foam in the box and it works great.  Packing foam made out of CLOSED channel foam, so the air trapped in the channels provides more cushioning.  But for the sound to be absorbed, it has to have a way to enter the material. This is why acoustic foam is made with OPEN channels. So-called “Open Cell Foam”  The sound gets in and then travels through the twisted channels bouncing off the internal walls and losing its energy.  The reason for the egg crate surface of the foam is to increase the absorption area and allow more opportunity for the sound to get in.  The thicker the foam the more sound it absorbs. This is why unechoic chamber lined up with acoustic foam with two feet deep wedges.

The other difference is that acoustic foam is generally rated as fire retardant – an important factor because some types of foam are extremely flammable and therefore not safe for residences and businesses


Acoustic blankets, on the other hand, work differently. Unlike moving blankets filled with low quality mixed with recycled polyester and cotton fibers, specialized acoustic Blankets known as “Producer’s choice”, filled with highly absorptive cotton.  As the sound gets in it agitates the cotton fibers and by making them vibrate it loses its own energy.

The thicker the blanket, the more filler it has, the better its sound absorption efficiency and broader its frequency range.  Using blankets in pleated fashion increases the absorption surface and increases the total quantity of absorption material in the room.


Fiberglass InsulationGlass fiber is another common absorptive material. The rigid variety such as Owens Corning 700 fiberglass series provides decent absorption in high and mid frequency range. Rock wool Safe and Sound is used to fill the space between drywall during construction for better soundproofing.  It is also can be used in the corners as a bass trap.   RockWool and  Glass fiber, of course, can be a major irritant, so make sure to cover it and do not disturb, to prevent strands from getting into the air.

Regular household materials such as soft furniture with fabric upholstery, pillows, curtains and drapes, blankets, carpet and so on, all absorb sound to one degree or another at mid and high frequencies.


HOW MUCH ABSORPTION SHOULD YOU USE?

So you have to get rid of reflections do you just line up the walls, floor and ceiling of your studio with sound absorbing the material and start recording?

But it’s not quite that simple.  Many types of absorptive materials only work well on higher frequencies, leaving midrange sound bouncing around without much control.

This can result in an odd, dark –sounding room with no high end. If you have too much absorption in the upper frequencies,  the mid- and high-frequency reflections will be reduced, but the bass frequencies will be bouncing around, resulting in a boomy, bassy room that sounds muddy.  Too much of the overall absorption and the room will sound too dead and it will be uncomfortable to work in.

The idea is to use just enough to control first reflections and to tame reverberation decay. Keep in mind that you can always add more absorption if the room still seems too live.

The right balance is the key to finding the right amount of absorption in the proper location so they will be as effective as possible – enough to control the mid and high range, and enough bass traps to end up with a balanced room response and an even reverberant decay across the frequency range.


HOW DOES IT RELATE TO VOICE OVER RECORDING?

The purest and cleanest of all is the direct sound energy.  This is the sound that travels in a direct (straight) line from the voice actor to the microphone

Sound energy reflected from objects in a room confuse the direct sound of our voice and make recording  “mudded”.

You want to have everything in the recording, emotions and different intonations and do not want to hear any sonic additions from your recording room.

Unfortunately, you must record in a “box” or room that has walls, ceiling, and a floor. When you speak into a microphone the sound radiates in many directions. The sound of your voice goes through the room until it hits an object or wall, then it reflects back and gets recorded by your microphone over what you are saying at the moment. 

Unlike the reflections in a control room where the sound comes from a speaker and reaches the engineer at some distance, in voice over recording you position yourself right in front of the microphone.  So your first reflections would be the reflections from the nearest reflective surface:   laptop screen,  walls to the right or left of you and a wall in front or behind you if you are sitting close to a wall.  Wherever the closest reflective surface is – that will be your first reflection point to treat acoustically.
Do not forget the ceiling and the Floor. They are also reflective.

Reflections arrive at your microphone delayed in time and add sonic distortions to your voice narration.  To minimize the sound of the room sound absorption works best for small recording studios such as home voice over studio.

For voice over actor who does individual work (one person commercial or book narration), having a small acoustic booth might be an easier and more effective and practical way to create the great sound recording environment, rather than acoustically treating the whole room.

Portable or small acoustic vocal booths are easy to set up and also easy to take with you if you have to move.

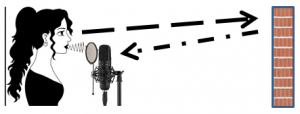
Untreated reflective surface reflecting the sound back at the microphone.

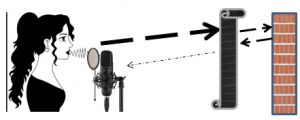
Reflective surface was treated with an acoustic blanket.  Reflected sound comes back with considerably reduced energy.


Signature:

VocalBoothToGo.com ( VocalBoothToGo.co.uk) specializes in providing effective and inexpensive acoustic room treatment products, such as Producers choice acoustic blankets for sound reflection control, Noise control products,  mobile sound booth, portable vocal booths and Vocal booth Rentals.

support@vocalboothtogo.com

Meet the Voices Behind Cortana and Siri

Ever wondered how Cortana or Siri came to be?  We have to admit, it is extremely convenient (and loads of fun) to converse with these voice assistants. The voices have to have come from somebody, but who?

Meet Jen Taylor, the voice actor behind Microsoft’s voice assistant Cortana. Cortana was made available to Microsoft mobile in 2014 when Microsoft launched their Windows Phone 8.1.

If the name Cortana sounds familiar it’s because Cortana is also the artificial intelligence companion for one of the best-selling military science fiction video game Halo of Bungie, a subsidiary of Microsoft Studios.   Unlike Siri, whose identity was unknown for a while, people almost immediately recognized the voice behind Cortana, as Microsoft didn’t look further into finding the voice for their phone’s personal assistant; they tapped the talents of Jen Taylor.

Jen is active in their local theater but has also been a voice actress since the late 1990’s, mostly voicing for video game roles like Left for Dead as Zoey and in various Mario games as Princess Peach, Toad, and Toadette.  Jen shares, “Voice acting is just like regular acting, but without the lights.”  She started playing the role of Cortana in 2001 and has since been part of the game franchise. 

You can watch an interview of Jen Taylor below:


The voice actor for Siri, however, was a secret for a long time. Kept unknown for many years, Susan Bennett finally revealed in an interview with CNN in 2013 about her identity.

Susan and Apple’s relationship all started with a text-to-speech project of Apple’s ScanSoft in 2005, recording various sentences, 4 hours a day for a whole month. Later on, these recordings were linked together to form various sentences and phrases to what we now know as Siri’s voice. Unlike Microsoft, Apple has not made it official that Susan is the voice of Siri, however, with CNN sponsored audio-forensic tests, it is confirmed that Susan Bennett is indeed 100% Siri.

This was not the first time Susan’s voice was used for a “machine.” Her first big break was with First National Bank of Atlanta as the voice Tillie the All-Time Teller, the first automated teller machine (ATM). She went on to voice the public address system of Delta Air Lines, various GPS navigation software and telephone system.

This seasoned voice actress of more than 40 years experience found it “creepy” the first time hearing her voice in something interactive, but she is now used to it and declares that she and Siri are friends.

You can watch her CNN interview below:

Why You Need to Pay Attention to Your Room Acoustics and Basics About Sound

With the availability of more compact and less expensive recording gear, available and easy to use software, it becomes very easy to record your gigs at home. 

But despite the fact this gear has definitely become much better, there is a limitation on home voice over recordings.  Most professional magazines talk about latest and most sensitive microphones or software that allows to “filter” the noise and “make you sound better”, yet it still does not sound as good as a recording made in a “professional” recording studio.

The reason is acoustics.  If your room does not sound good – it will be very difficult to produce great sounding results.  This, of course, translates to your ability to get repeat business and eventually make a good living doing what you love.

Acoustics can get intimidatingly complex, but treating tour room acoustically does not have to be difficult, or require hours in front of a calculator. Understanding how sound works in the room and how to apply that to creating your home recording space can get you a long way to sounding your best without major construction work or spending too much money.

Whether you are converting your garage, bedroom or a closet into your voice over recording studio, knowing the basic principles of how the sound works will help you to improve the sound in the room you are making the recording.


Acoustics is defined as

  • the science that deals with the production, control, transmission, reception, and effects of sound and
  • the qualities or characteristics of a room, auditorium, stadium, etc., that determine the audibility or fidelity of sounds in it.


In most cases improving the acoustics in your room will result in the biggest improvement in the way your recording sounds.

So while the expensive microphones allow you to capture your best sound, it is the room acoustics is what allows you to sound your best.

This is why commercial studios spend tens of thousands of dollars to design and build acoustically optimized spaces.  But you do not have to spend thousands to make your room sound good. For very little money you can make even the worst space sound good. So how?


First, we need to define two major aspects of your room treatment:

Acoustics and Sound Isolation

When we talk about the “acoustic room treatment” we are not talking about stopping construction noise from the street getting into your mic.  And we are not talking about your own voice annoying your neighbors.   These are examples of “soundproofing” or rather “sound isolation”  – stopping the transmission of sound from one point to another.  We can talk about this in a different article.

Room acoustics, or the way the sound generated inside the room behaves within the room itself, has very little to do with the ability of the sound to go through the barriers and spread out ( or into) your recording space. The approach is different, the materials are different as well.

People often get this confused, but materials used to “soundproof” your room will do nothing for helping your room acoustically and actually in some cases can make it even worse.


So what is Sound?

“Sound”  in most people experience is what we can hear.  In physics, “sound” is a vibration that propagates as a typically audible mechanical wave of pressure and displacement, through a transmission medium such as air or water.

So basically sound is the energy of vibration, and that energy requires some sort of medium to spread around.  It spreads by agitating/vibrating adjacent molecules in the medium, so it can go through the air, water, steel etc. The denser the medium the faster it travels.  In the absence of a medium, such as in vacuum it ( sound energy) cannot spread so there is no sound in Space.

Since it is the energy of vibration, sound travels in waves. Called “soundwaves”.  Like if you wave your hand in a bathtub water you will create waves.  In this example your “vibrating” hand simulates a sound source and the waves in the water will be like “sound waves” spreading all around the tub.

Now you can wave your hand faster or more slowly and with more force, the resulting waves in the tub will also change the pattern.  That wave pattern is important in understanding of basic characteristics of sound:  Frequency, Wave length, Amplitude and Phase.

Try to vibrate your hand fast and easy – the resulting waves will be shallow, frequent and low in height. It will require very little effort on your part to make them.

Now try to wave your hand wider and more forcefully , this will be much harder to do and the waves will be deeper/higher and then will come not as often, and most probably will splash out of the bathtub because they are so high and strong.

You will also notice that the waves are bouncing back from the walls of the bathtub.  You can stop and watch what happens to the waves after you stopped generating more of them.

What you just did you created a model of how the sound waves work. A model that you can actually see.

Have that image in mind this might make it easier to understand how the sound works.


Sound waves and Frequency

Sound travels in waves.  Unlike your bathtub water waves, sound creates area of Dense (wave peak) and Rare (wave valley) pressure, because the sound spreads in all directions at the same time (omnidirectionally).  The frequency of the waves or how fast and how often the waves come, determine the pitch of the sound.  Frequency is measured in Hz (“Hertz”, after Heinrich Hertz, who had described this first). The higher the frequency, the higher the note. 

Human ear generally can hear between 20 to 20 000 Hz.  Sound above 20 000 inaudible to the human ear is called ultrasound.  Ultrasound is used by some animals for echolocation.

Sounds below 20 Hz called Infrasound. Infrasounds used for communication by some animals and also by people for monitoring earthquakes (seismic activity).

But for acoustic purposes we are mostly concerned with the audible range of frequencies.  And the related aspect here is “frequency response” .

 Frequency response refers to the way a microphone responds to different frequencies. It is a characteristic of all microphones that some frequencies are exaggerated and others are attenuated (reduced). For example, a frequency response which favours high frequencies means that the resulting audio output will sound more trebly than the original sound.

Ideally response should be the same for all frequencies or “flat response” .  This is virtually impossible to do, so the goal here is to “smooth things out”.


Amplitude of Sound

This is the Volume of sound, that measured in dB.  A decibel is defined as the smallest volume that can be perceived by human ear in isolation.  ( note “in isolation” means without reference to another sound. In reference to another sound trained ear can perceive sound volume changes as low as 1/10th of a decibel). 

A very quiet professional recording studio may have 30 to 40 dB of background noise, while Jet airplane engine can produce 140 dB of noise. This is not that the Jet engine noise is only 4-5 times louder than a professional recording studio, but dB level is measured on a logarithmic scale. In approximation, every 10 dB difference is about a 100 times change in sound energy level.


Wavelength

Wavelength is the length of a sound wave.  (did I have to explain that?)  It is related to the frequency of the sound waves. The higher the frequency – the shorter then waves. The lower the frequency the longer the waves.  Think of the bathtub example or the ocean.  On a nice calm day, you can see multiple small shallow waves coming onshore in brief succession.   Or you can see huge long waves crashing against the rocks during a storm.

The wavelength is important in combination with “phase” when dealing with room acoustics.


Phase

As the ocean waves have the Peaks and valleys, the sound waves also have the peak and trough. The term “phase” describes the relationship of two waves in time. If two identical waves that are at the different points of their cycle are combined, they may cause problems.

Phase is important in the acoustics and recording because the waves that are out of phase can cancel each other or vice versa reinforce each other resulting in tonal changes.

Phase problems occur when the sound bounces around the room.  Sound reflection is not a characteristic of sound per se, but it plays a major role in the room acoustics.  The reflective waves interfere with each other destructively, causing all sorts of problems.  Sound intensity near the hard surfaces because reflected wave adds to the original sound wave.

So Reflection control will be our next topic.


Signature:

VocalBoothToGo.com ( VocalBoothToGo.co.uk) specializes in providing effective and inexpensive acoustic room treatment products, such as Producer’s Choice acoustic blankets for sound reflection control, Noise control productsmobile sound booth, portable vocal booths and Vocal booth Rentals.

If you have any questions, contact us!

Sound Absorbing Ceiling Baffles

Vocal Booth To Go is happy to offer a new product to help get your home studio acoustics under control.

Most acoustical solutions are either mounted on a wall like acoustic foam or sound absorbing panels, or standing on the floor, like free-standing sound absorption gobo.  These surfaces are lending themselves for easy support. But what about the ceiling?

Ceilings are a major reflective surface and often remains untreated.

VocalBoothToGo has been offering the ceiling tiles, that have grommets all around the perimeter and can be suspended on hooks off the ceiling.  These tiles work well in small enclosures to cover the ceiling in your booth.

For larger studios, installation is a bit less convenient since there is a need to use several hooks to hang the blanket. This requires you to do more work and make more holes in the ceiling.


Now we offer a new product – The Ceiling Baffle.

Ceiling Sound Baffle blanket    Sound absorption panels    Ceiling sound baffle blanket for sound absorption

This “new” product is actually a forgotten yet very effective old sound absorption ceiling baffle.

It has several advantages:

First of all, the baffle can be suspended from the ceiling using only two hooks or strings. So installing several baffles in a larger studio is much easier and requires less drilling and less hardware.

Secondly, the baffle not only cancels the sound reflected directly off the ceiling, but also the sound going across the room. And because you would normally install several baffles in a ceiling, they may absorb more low-frequency noise than an acoustic blanket that is installed flat on the ceiling.

Thirdly, it can be shaped in a semicircle or to go around obstacles, such as air ducts or pipes.  It can also be used to hang in front of the air ducts to cover the ugly pipes and have a great acoustic treatment at the same time. We provide 8 grommets per baffle in order to be able to hang the blankets in a shape the best helps to fix your room’s acoustic problems

This Ceiling Baffle allows you to control the noise and reverberation reflected off of the ceilings and add dimension and acoustical control right where you need it the most.

This product is made out of our Producer’s Choice sound absorption material, NRC 0.8 ( 80% noise reduction). The length is 78 inches and the width is 19 inches. Its design allows you to hang the baffle in any shape to fit your needs.

This product is a great addition to noise reduction panels and sound absorption blankets.


If you have any questions about our Ceiling Baffle, give us a call at  (877) 428-6225 or fill out our contact form.

error: Content is protected !!